How to save a SharePoint folder to your File Explorer
The purpose of this KB is to walk users through the step to adding a SharePoint folder to their File Explorer. This method relies on using Microsoft's cloud technology through OneDrive and Network Connectivity to ensure you are getting the most recent updated version of a file as possible. This ensures that if you are collaborating with team mates that you see their changes and know when they are working in the same file as you.
- Make sure you are signed into your OneDrive. To check this, open OneDrive, by double-clicking the cloud icon in your system Tray, or by searching for "OneDrive" using your desktop search bar:
If you are already signed in, it will open your file explorer. If you are not, it will ask you to sign in using your Microsoft credentials and ask you what you wish to have synced from your local PC first. - Navigate to the Sharepoint Site that has the files you wish to save/sync. If you don't know this, please reach out to Michael DeSantis or the site owner.
- Click on "Documents" and then select the file you wish to sync:
- The File Path will always be listed above the list of what's in the folder. Once you are in the folder you wish to add, click the "Add shortcut to OneDrive" button:
- Once linked, the folder will show under your OneDrive as a file icon with a chain link to symbolize that it is a linked folder.
- DONE!
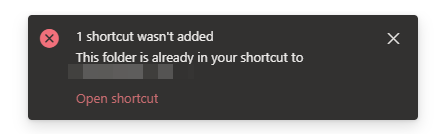
Sometime you may get an error message that says it is unable to add the shortcut. If you get this error message, it means you already saved the folder or parent folder as a shortcut so you should check your File Explorer. If you check your File Explorer and still do not see the folder, please contact Michael DeSantis for further assistance!
Announcement: Calyx has identified an issue with Calyx Point caused by a recent Microsoft Update. Due to the update, all custom forms will not work currently. Their development team is currently working to resolve the issues. Please click "Learn More" to follow the issue and get updates.
Learn More
Learn More
Related Articles
How to change your "Open file explorer to:" option
The purpose of this article is to walk users through the steps of setting/changing your option for which page is opened by default in Windows File Explorer. This is particularly helpful if you find yourself often choosing a different option than the ...How to Manually Navigate to a Folder
The purpose of this KB is to walk users through steps on how to access specific folders. Most often, this will come in handy for those who are trying to access as subfolder that they have been granted access to, but they do not have access to the ...Locating Shared items and sharing a File or Folder with others in Zoho WorkDrive
The purpose of this article is to walk users through the steps of sharing items (Files, Folders, etc.) in Zoho WorkDrive. This includes Zoho Sheets documents, CRM attachments and more! The benefits of this feature include: The ability to collaborate ...How to Save Documents in ZohoSign
The purpose of this KB is to walk you through the steps of downloading documents from ZohoSign. This process downloads a version which is able to be combined with other PDFs for work needs. How to save documents from ZohoSign Log-in to ZohoSign ...How to add folders
•Close Calyx Point •Click on Start Menu on the bottom of the screen •Type Point Administrator, open window •Click on Data Folders-Set Up •Connect Existing •Browse •N Drive-drop down •PNT DATA (Click on), OK, OK •Green Check Box, In Process Folder ...